Archive for the tag 'props'

Flotsam and Jetsam

lighthouse island set

Earlier this year I made the set and props for Flotsam and Jetsam, a production for children which tells stories about living on Australian lighthouse islands in the past. The script was written by Greg Lissaman, from recollections gathered by Chrissie Shaw, the actor. Catherine Roach is the director.

The set is an island, panels painted in a pointalist style, which can concertina into different shapes and be dismantle for touring. The lighthouse is modelled on the historic lighthouse at Cape Otway in Victoria, and Tasman Island in Tasmania was among other sources of stories and images, such as the flying fox access to the island. There were numerous props – seaweed, wooden chests, a porcelain doll, an albatross, and a sea buoy. There are more photos of these in my  Flotsam and Jetsam photoset.

Touring dates and booking details for Flotsam and Jetsam are listed at Chrissie’s site. On 19 – 21 August it has a short season at the Maritime Museum in Sydney, and then it will tour coastal community venues in NSW. Chrissie also performs The Keeper, an adult play also based on lighthouse stories.

lighthouse

flying fox
seagull skeleton
porcelain doll

Kevin Rudd glasses

Kevin Rudd glasses

Eight pairs of sparkly Elton-John-sized Kevin Rudd glasses made for Shortis and Simpson’s lastest political satire, Three Nights at the Bleeding Heart, currently at the Street Theatre.

A little heffalump

Elephant

I’m starting to get fond of the little elephant that I have been making over the last few days. That’s always a good sign.

Elephant

He can do tricks! And now has cool trunk to look down modestly while trying to pretend he isn’t a Brave and Clever Elephant.

Elephant

I have to set him aside to finish in March now, as I have to move on a couple of other projects that are vying for my time.

All the wild little horses

Horse sculptures

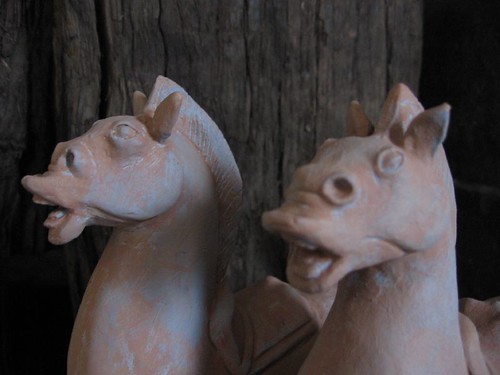
I loved making these two little horses recently for an up-coming theatre production, Emma’s Dynasty, by Jigsaw Theatre Company. They are based on an earthenware Chinese Han Dynasty horse that is here in the Australian National Gallery collection, but they are tiny in comparison, only 17 cm high at the head. I really like how stocky and wild the horse is, and how he looks like he has come to a screaming halt.

Horse

A while ago Andrew at PuppetVision linked to a super sculpey sculpting tutorial by Peter Konig, and it was really useful to me while I was doing the horses – thanks to you both! The tutorial is much more detailed than what I am going to write here – no sense repeating – and I can really recommend it.

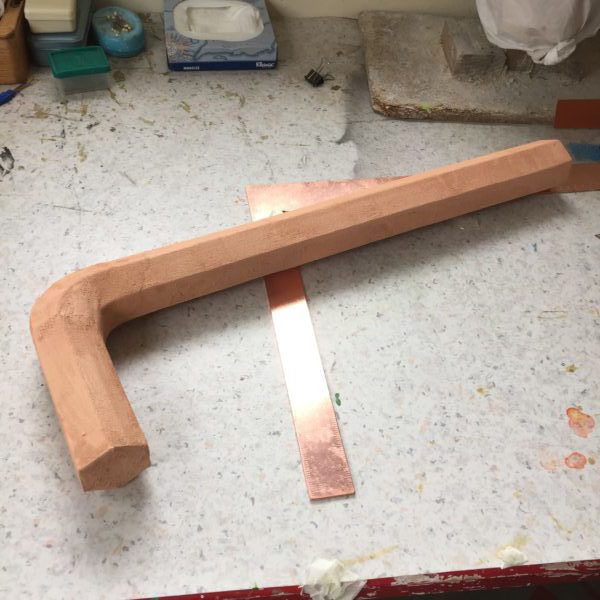
The first steps were to make an armature using armature wire. In this case the strength the armature gives the legs and tail is particularly important. From the nose to the tail is one wire, and then the legs are separate wires, wired on with fine wire (Peter has close-ups on how to attach them), and set in place with Knead-It, a Selley’s two-part epoxy. You knead the parts together, and it sets as hard as a rock in five minutes – invaluable stuff!

Horse sculpture

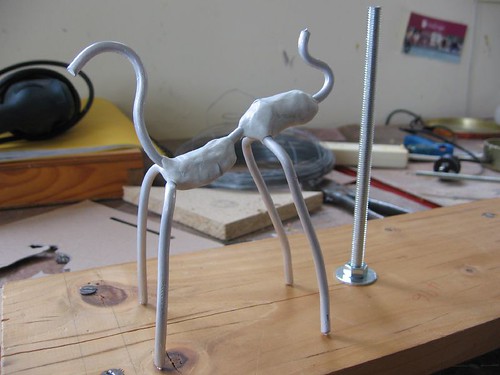
I also used wire and Knead-It to attach the armature to a firm stand. I struggle with being too impatient at the beginning of a project to go to the trouble of making a firm base like this, and I often regret it – and know I’m going to regret it, what’s more! However, I’m getting wiser about this, and decided to follow Peter’s advice, even though the horse was small.

Horse sculpture

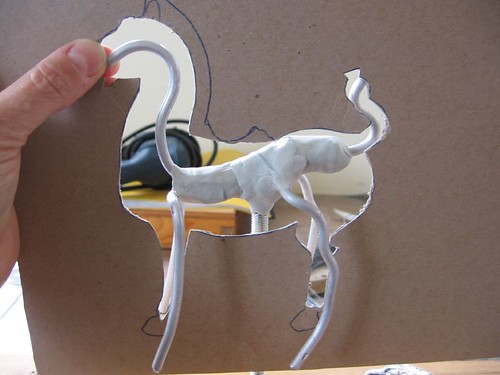
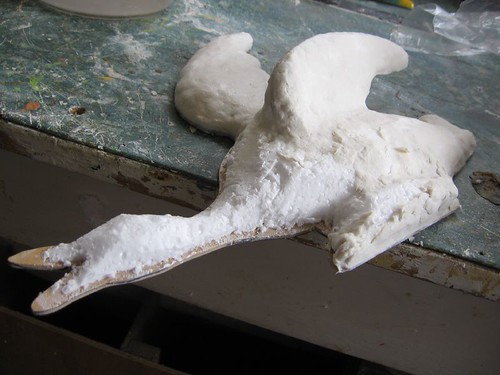
Another tip that I appreciated was to make a cardboard cutout of the silhouette of the horse to use as a reference while sculpting. I usually sculpt by eye, but this allows you to check how you are going.

Horse sculpture

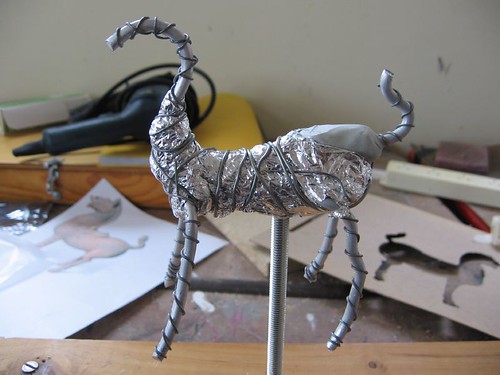
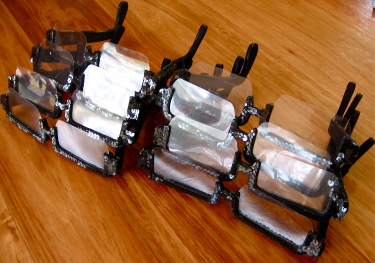
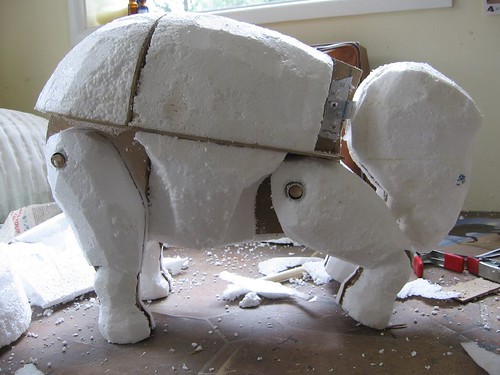
I padded out some of the bulkier parts of the body with aluminium foil, as a way of saving how much super sculpey I needed to use later. Wire is wound around the armature wires to give something for the modeling clay to grip onto.

Horse sculpture

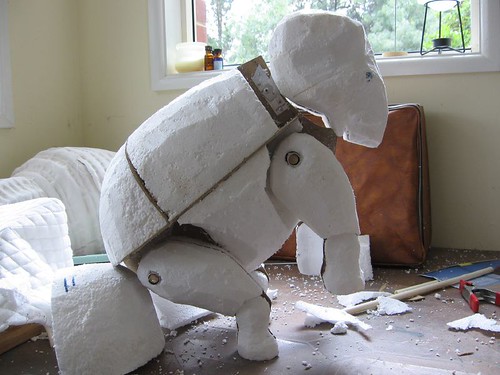
Now the best bit, the modeling! I’ve only recently started using Super Sculpey, and its a real pleasure to work with, because it remains soft for a long time and takes detail so well. Peter says to check it’s soft when you buy it, in case its been on the shelf a long time, and to keep it in a zip lock plastic bag.

Horse sculpture

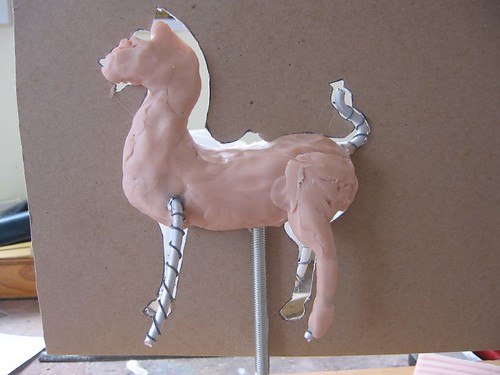
So she kneaded it and punched it and pounded and pulled till it looked okay… You can use mineral turpentine to gently bush the surface detail to smooth it, and almost model the tiny detail with the brush.

Horse sculpture

Into the oven to bake. I had trouble fitting it in my oven still attached to the stand, and ended up putting it in on its side. I thought trying to cut off the support before the horse was baked might risk the horse getting squashed. Maybe next time I should make it so it unscrews instead.

Horse sculpture

Sawing the support bolt off was a little tricky, but manageable. There were a few small cracks, but I gather this is quite common, and took Peter’s advice to fill them with sculpey and blast it for a few seconds with a heat gun, only in my case it was with a hair dryer. Instant glue is effective for mending breaks. Then, on to the second horse.

Horse sculpture

Super sculpey takes acrylic paint very well, and I used a dappled mix of greys and terracottas to get the final finish.

Horse sculptures

There are more photos here. I guess I got a bit carried away, but sometimes that just happens.

Horse sculptures

Flying ducks again

Painting

The ducks have progressed to the painting stage, and I should finish them today. When the paper mache dried fully, it somehow warped the necks and top wings slightly, so that the ducks didn’t sit flat against the wall, so I had to do a bit of surgery, making a cut in each tension point, and filling it to push the part back. I also spent quite a lot of time smoothing the surface and sanding and filing the feather shapes, as the paper mache doesn’t allow fine shaping, and dries just a little bumpy. It’s also proving tricky to get the glazed translucent look that the ceramic ducks have. I am putting a lot of hope in the final varnish!

Update:

This is how they turned out. They are for “1 in A 100″, a play about mental illness (synopsis here) written by Mary Rachel Brown, directed by Carol Woodrow, design by Imogen Keen, at Canberra’s Street Theatre in May 2007.

IMG_3780-1

Flying ducks

I’m working on several projects at once at the moment. One is making a set of those flying ducks that people had as wall ornaments when I was growing up. I’ve been lent a couple to model from, and looking at them up close I can understand their attraction, despite their kitsch reputation. Since the ones I am making are theatre props they only have to look like the real thing. Inside, they have an mdf structure, and I have bulked them out with polystyrene. I like carving styrene, except for the mess.

Flying ducks

The next part of the process is covering the shapes with a commercial paper mache pulp. It starts as a dry mix, and when you add it to water it turns into a thick paste, which can be smoothed on and sticks to most surfaces. Here I’m half way through adding the paper mache to the big duck:

Flying ducks

The pulp takes a couple of days to dry, but I’m always impatient with things like this, and I have been hurrying it along by putting the ducks in the sun,

Flying ducks

and the oven:

Ducks in the oven

I’ll have to add more detail to the shapes, like the eyes, tails and feather patterns, and then its a matter of getting the surface smooth and painting it to look like china.

We have four beautiful white pet Indian Runner ducks, and it was funny to see them charging across the back garden in a line just as I was photograhing these in the kitchen.

Lord of the Rings Exhibition at the Powerhouse

The Powerhouse Museum in Sydney is hosting a great exhibition to do with how Lord of the Rings Motion Picture Trilogy was created. Its been running since late December, and will close on April 3rd.

There is a lot to see: props, jewellery, weaponry, armour, costumes, models, artefacts, design drawings and paintings, marquettes, moulds, the Ring itself, and prosthetics. There is also a swag of video coverage about how the digital effects, special effects and make-up were achieved, and video interviews with cast and crew, though a lot of that already appears on the extended DVD.

I’m not a great fan of Lord of the Rings. Its unrelentingly male, and I’ve always appreciated the joke that Shelob is the most convincing female character. But there was lots to enjoy about the films, and this exhibition. My overwhelming impression was how wonderfully detailed everything was, and how much thought and care had been given to its making.

Gandalf’s grey robe is made of a beautiful rough mixture of natural fibres, (linen, hemp and silk, if I remember correctly) woven locally in NZ. I got a buzz out of seeing his wonderful bent felt hat (after John Howe’s great illustrations) , as well as all his ancient tomes. And lying among them, the charming surprise of his toffee bag, a small drawstring leather pouch!

Gdf2

Gandalf the Grey (courtesy www.john-howe.com – cool site!) Despite being a real Cate Blanchett fan, I had been disappointed with how Galadriel’s character was written in the film. But her dress was stunningly beautiful, white and luminescent. In contrast, the vacant dark Ring Wraith’s costume had a real sense of foreboding about it.The jewellery, weapons and objects like sword sheaths and straps were beautifully crafted and decorated. It was fun to see Frodo’s mithril coat of mail, and actually handle samples of the chain mail that was painstakingly made for Gimli’s and other characters’ costumes.

There were reproduction models (specially made for the exhibition) of Treebeard’s head, the cave troll and a goblin, which were cool. I loved seeing the marquette of Shelob’s head, and finding out that she was modelled on a tunnel web spider that the Kiwi designer Christian Rivers found in his garden. Of the building or scene models, I particularly liked the ruined Hobbiton Mill.

From a maker’s point of view it would have been good to find out in more detail the exact process of how some of these things were made, and the materials that were used, but I guess that would be catering to too specialist an interest. I haven’t read The Making of the Lord of the Rings, but I doubt that would go to that level of detail either.

I hoped to be able to buy a postcard of Galadriel’s dress to send to a friend’s daughter, but the merchandise in the inevitable shop at the end was boring, just the usual stuff that has been around in shops anyway. You would think that it would have been worthwhile for both sellers and buyers to have some merchandise available that actually reflected the finer focus of the exhibition.

You are meant to book for the exhibition if you are not a member, though the crowds had dropped off when I saw it a few weeks ago, and it was easy to get in. If you decide to go, its worth considering a membership to the Powerhouse. We qualified for a ‘rural family’ membership which cost $2 more than entrance to the exhibition, and gives us other perks for the year ahead not only at the Powerhouse, but places like the National Gallery of Australia and Questacon.