Feed on
Posts
Comments

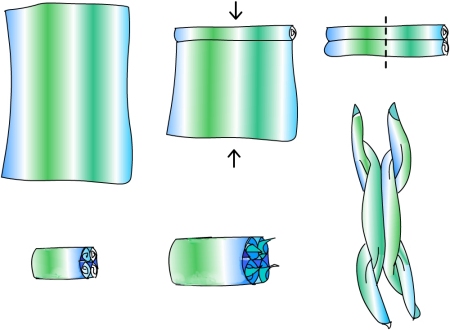
My friend Louise told me how to make this folded tea towel chicken; thanks Louise!

‘Lay a tea towel flat on the table, with the short sides at top and
bottom. Roll the top side down, stopping at the middle, then roll the bottom side up to touch. Fold the left side over on top of the right. Grasp each of the four corners from the middle of their rolls, then holding the two top in one hand and the two bottom in the other, pull it out.’

Chook
Apparently there is a story that is told as you fold, about the chook escaping and running up the hill and down the hill, (while you are rolling the tea towel from each end) with the farmer in pursuit. Then at the end you hold up the dead chook. If anyone remembers exactly how it goes, do please tell me!

The jumping hankerchief mouse

This looks complicated, but its not – its just long-winded to explain.

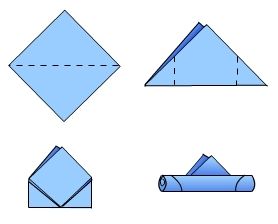
For this trick you need a man’s handkerchief or a square cloth of a similar size. Smooth it out flat (on a table) as in the diagram below, and then fold it upwards diagonally in half. Fold the corners in from each side so that the points meet in the middle at the bottom. From the bottom edge, roll the handkerchief upwards, but stop before you get to the top, so that the top corners peep out as a small triangle of cloth:
Mousea
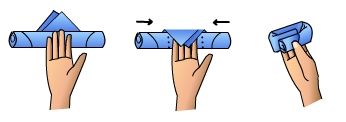
Turn your hand palm-side up and rest your fingers on the roll of handkerchief just below the triangle. Fold the triangle down over the tips of your fingers, and, keeping that in place, fold first the left side of the handkerchief roll across over your fingers and then the right side. Hold it firmly with your thumb:
Mouseb
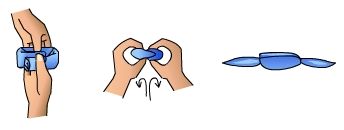
Now put the fingers of your other hand back-to-back with the fingers holding the handkerchief, slipping them up into the back of the handkerchief roll. The thumb of that hand will naturally rest on top of the handkerchief. Push your thumbs away from you, pushing down into the middle of the handkerchief roll, and almost turning it inside-out as your hands start to turn over. This will start an action of rolling each side of the roll in towards the middle. As you keep doing this, the material on the left side will gradually wind onto the right-hand side, and two ends of handkerchief will shake out, so that the handkerchief now looks like a weird Christmas cracker. One end is the mouse’s tail, but the other one has a knot tied in it to make the head.
Mousec
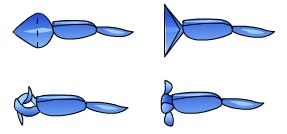
To make the knot pull the edges of one of the tails out gently sideways, and then fold the point back towards the body, making a triangle. The two points of the triangle that stick out can then be used as the ends when you make a simple hand-over knot, twisting one end over the other and back through the hole. Pull the knot tight to make the head, with the ends becoming the mouse ears.
Moused
Now to make it jump! Place the mouse in your cupped hand, with its head looking up your arm, and your fingers curled gently and tucked under its bum:
Mousee
These fingers can now act like a spring, pushing the mouse forward suddenly whenever you want. Put your other hand over the top and pet the mouse to hide the action. You can make the mouse look restless and if its trying to escape out of your hands if you make the action light, or make it jump out of your hands by giving it a good push. You can aim it up your arm, and then make it look as if its running right up to your shoulder by lightly using your right hand to very quickly and repeatedly pick up and drop the mouse as you push it up your arm. If this is done well it is very realistic!Its fun to make the mouse restless and ‘naughty’, and then give it to someone else to pet and see if they can make it settle down. Of course its docile and ‘good’ for them, but when they give it back to you to stroke, it immediately misbehaves, jumping out of your hand and up your arm into our hair!
In Arthur Ransome‘s delightful series of ‘Swallows and Amazons’ children’s books from the 1930’s, the kids use owl calls to signal to each other at various points in their adventures.

“There was a noise in the wood below them, a noise something like an owl and something like a cuckoo, ending in a gurgle of laughter that was not like a bird at all.
“Here they are,” said John.
“It’s no good their trying to make the owl call,” said Roger. “They can’t do it.”
“What they’re good at is ducks,” said John. “I’ve never heard anybody quack so well as Peggy.”
“Nobody can be good at everything,” said Titty.

— from ‘Swallowdale’

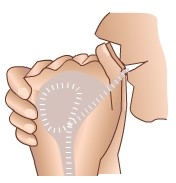
I always imagine that they are making owl calls by blowing through their hands rather than too-wit-too-wooing. So how do you do that? Clasp your hands together like this:

Whistlea_1
If its more natural for you to have your hands wrapping around in the opposite way, thats fine; go with what feels best. Widen the clasp of your fingers so a little cave forms inside your hands. Your fingers can start fairly relaxed as long as they don’t let air escape between them. Now press your thumbs towards each other so that there is only a very small slot between them. The tops of your thumbs should be bent over so the top joints make little ‘mountains’, and the second joints of your thumbs roll inwards towards each other a bit so the fleshy part of your thumbs are pressing together firmly.
Whistleb
Now curl your lips a little around your teeth, and with mouth slightly open, press your lips to the top thumb joints, take a breath and blow through and down into the hollow of your hands. The air seems to tumble around in the hollow and then goes out through a small gap between your palms at the bottom of the hollow. Hopefully you have just made a cool owl call! But its more likely you will have to experiment and practise a bit to get the knack. Try altering the shape of the hollow by tensioning your hands differently, or blow more or less forcefully. Often a more relaxed clasp and a gentler blow makes the best whistle.Once you can do this whistle, you can trill the call by briefly opening and closing the bottom three fingers of the hand that wraps around the back of the clasp, or vary it by making different sequences of long and short calls. The tone is just right for a dove call, too, such as this one recorded by MatthewJCook.If you want to learn how to make that kind of piercing whistle that people make with two fingers in their mouth, there are excellent instructions here.

Nasturtiums

Nasturtium leaves are very cool to mess around with. Pick a large nasturtium leaf, and try to catch some water in it. Something about the surface of the leaf resists the liquid completely, so that the water forms into beautiful round silvery drops that race around and off the leaf before you know it. They behave like mercury (have you ever broken a mercury thermometer?), but are not poisonous like mercury.

Catching the water is fun itself, but then you can try to see how big a drop your leaf can hold. Or see how many small drops its possible to accommodate on your leaf, since the moment two drops touch, they become one bigger drop. Or you can run races and see who can go furthest and fastest before your drop slips out of the leaf.

Nasturtium_2
I know an elderly man who recalls riding to school on a horse, and stopping on the way to pick young nasturtium leaves to put between slices of bread for his lunch. The leaves have a really nice peppery taste, and are high in vitamin C. You do get more sophisticated nasturtium sandwich recipes, and there are numerous ways to use the flowers and leaves in cooking and medicine. The whole plant is edible and regarded as a herb. The seeds can be pickled and substituted for capers. And, of course, the flowers themselves are the most beautiful oranges, reds and yellows.

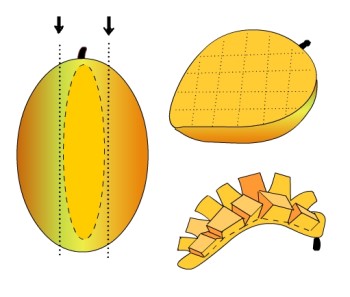
This easy and fun way of preparing mangoes is sometimes called making mango porcupines. First you use a sharp knife to fillet each side of the mango, cutting off the ‘cheek’, and getting as close to the mango pip as you can. Then on each cheek make cuts in the mango about 2cm (1/2 in) apart in a criss-cross pattern, but don’t cut through the skin. Now if you push the skin from underneath it will pop the inside out, and the squares become mango cubes that are easy to spoon off or schloop up with your tongue. Then you can go back to peel and eat the small amount of mango left around the pip.

Mango

How to make a balancing moth

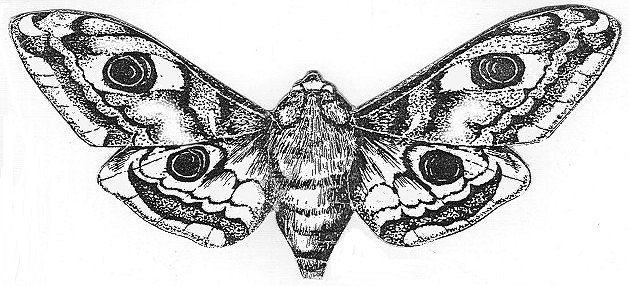
Magic moths are lots of fun. When your moth is made you can make it hover with just its nose resting on your fingertip, the rim of a glass, or even the point of a pin.

Click on the moth to pop-up the full-size image, download it, and then print it out onto thin card. The 18cm (7in) wing span is ideal, but it will work whatever size you make it. Cut around the outline. Colour it in or decorate it if you want to.

Mothx
Now you just have to add a small weight underneath both wing tips. The easiest thing to use is a little blob of blu-tack (tack-n-stick). You could also try using small coins, buttons, or magnets, sticky-taped under the wing tips. Blobs of hot glue would likely work too. Or you can slip paper clips onto the tips.When you have the weights attached, put your fingertip under its nose and see if it balances as if its hovering. If the weights are too heavy the wings will droop too much, and if they are too light the moth will fall off your finger. If one wing is heavier than the other, of if you have not placed the weights symmetrically (in the same spot on each tip), the moth will pull to one side and fall off. Make small adjustments until its balances easily.Now you can run around the house seeing all the different amazing places you can balance your moth. These make cool presents!

This pattern was scanned from a ‘magic moth’ I have had for many years, and I can’t find any attribution on it to pass on. If you want to, you can just use the outlined shape and draw in your own wing patterns. You can also try changing the shape a little to make a balancing butterfly or bird.

You may see this trick in other forms: you can buy plastic balancing birds, and balancing wine bottle holders. I’ve also seen a gravity defying frog pattern.

A banana trick seems to be an appropriate way to start off this blog… This is a way to amaze the whole room by giving someone a banana that it has already been sliced inside!

You will need a banana that is ripe enough to already have some black spots on it, so that the tiny holes you will put in the skin won’t be noticeable. Then you need a very fine needle that is long enough to go from one side of the banana to the other, threaded with about 30cm (12 inches) of thread.

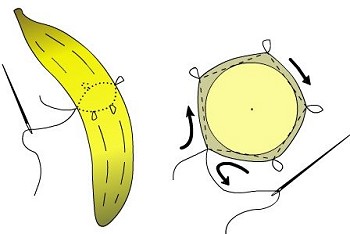
The idea is to put a loop around the banana, but inside the skin. You will notice that the banana has 5 or 6 or so ‘corners’. Push the needle into the banana at one corner, and run it under the skin through to the next corner, and out. Pull the thread through, but leave a tail of thread at the beginning. Now push the needle back into the hole it just came out of, and through to the next corner. This time leave a little loop at the corner where your needle went in. Continue in this way around the banana, until your needle comes out of the hole where you started. You now have a loop around the banana inside. Now you pull gently on both the ends of thread that are emerging from that one hole. The thread will slice the banana and get pulled out of the hole. Be careful when pulling the ends that you pull them in the directions in which they are already travelling, otherwise they can tear the hole.

Banana2
Repeat this operation down the length of the banana, making however many slices you want. Then it only remains to give the banana to some unsuspecting person, and sit back and watch :-).