craft

All the wild little horses

Horse sculptures

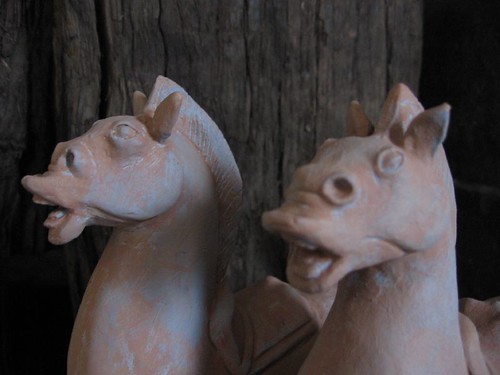
I loved making these two little horses recently for an up-coming theatre production, Emma’s Dynasty, by Jigsaw Theatre Company. They are based on an earthenware Chinese Han Dynasty horse that is here in the Australian National Gallery collection, but they are tiny in comparison, only 17 cm high at the head. I really like how stocky and wild the horse is, and how he looks like he has come to a screaming halt.

Horse

A while ago Andrew at PuppetVision linked to a super sculpey sculpting tutorial by Peter Konig, and it was really useful to me while I was doing the horses – thanks to you both! The tutorial is much more detailed than what I am going to write here – no sense repeating – and I can really recommend it.

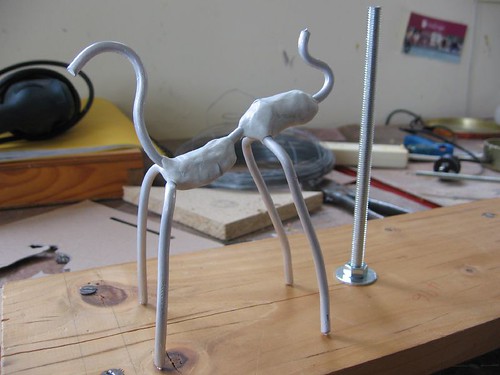
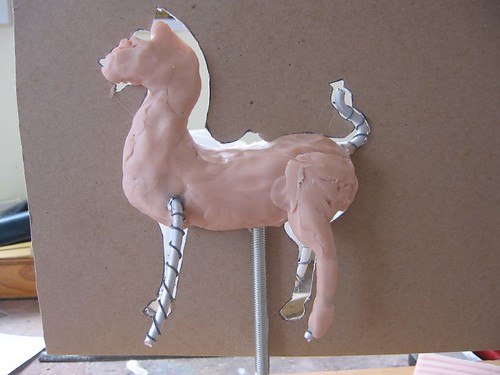
The first steps were to make an armature using armature wire. In this case the strength the armature gives the legs and tail is particularly important. From the nose to the tail is one wire, and then the legs are separate wires, wired on with fine wire (Peter has close-ups on how to attach them), and set in place with Knead-It, a Selley’s two-part epoxy. You knead the parts together, and it sets as hard as a rock in five minutes – invaluable stuff!

Horse sculpture

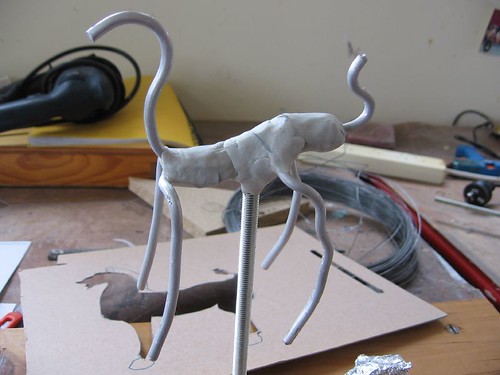
I also used wire and Knead-It to attach the armature to a firm stand. I struggle with being too impatient at the beginning of a project to go to the trouble of making a firm base like this, and I often regret it – and know I’m going to regret it, what’s more! However, I’m getting wiser about this, and decided to follow Peter’s advice, even though the horse was small.

Horse sculpture

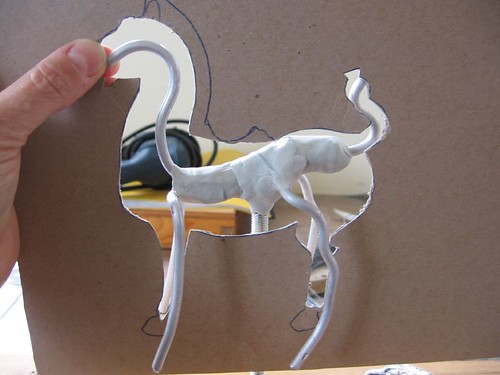
Another tip that I appreciated was to make a cardboard cutout of the silhouette of the horse to use as a reference while sculpting. I usually sculpt by eye, but this allows you to check how you are going.

Horse sculpture

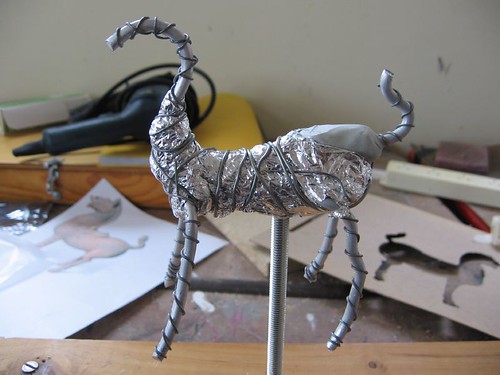
I padded out some of the bulkier parts of the body with aluminium foil, as a way of saving how much super sculpey I needed to use later. Wire is wound around the armature wires to give something for the modeling clay to grip onto.

Horse sculpture

Now the best bit, the modeling! I’ve only recently started using Super Sculpey, and its a real pleasure to work with, because it remains soft for a long time and takes detail so well. Peter says to check it’s soft when you buy it, in case its been on the shelf a long time, and to keep it in a zip lock plastic bag.

Horse sculpture

So she kneaded it and punched it and pounded and pulled till it looked okay… You can use mineral turpentine to gently bush the surface detail to smooth it, and almost model the tiny detail with the brush.

Horse sculpture

Into the oven to bake. I had trouble fitting it in my oven still attached to the stand, and ended up putting it in on its side. I thought trying to cut off the support before the horse was baked might risk the horse getting squashed. Maybe next time I should make it so it unscrews instead.

Horse sculpture

Sawing the support bolt off was a little tricky, but manageable. There were a few small cracks, but I gather this is quite common, and took Peter’s advice to fill them with sculpey and blast it for a few seconds with a heat gun, only in my case it was with a hair dryer. Instant glue is effective for mending breaks. Then, on to the second horse.

Horse sculpture

Super sculpey takes acrylic paint very well, and I used a dappled mix of greys and terracottas to get the final finish.

Horse sculptures

There are more photos here. I guess I got a bit carried away, but sometimes that just happens.

Horse sculptures

Bent Objects

Bent

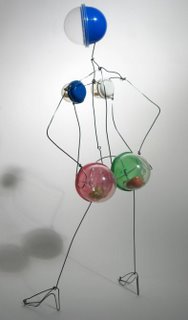
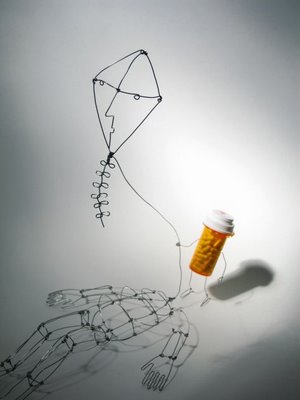
Terry at Bent Objects makes these lovely whimsical figures and scenes with wire and everyday objects. They remind me of the wire figues in Calder’s Circus, and I can imagine them being brought to life as puppetry.

Kite

(via Craft Magazine)

Flying ducks again

Painting

The ducks have progressed to the painting stage, and I should finish them today. When the paper mache dried fully, it somehow warped the necks and top wings slightly, so that the ducks didn’t sit flat against the wall, so I had to do a bit of surgery, making a cut in each tension point, and filling it to push the part back. I also spent quite a lot of time smoothing the surface and sanding and filing the feather shapes, as the paper mache doesn’t allow fine shaping, and dries just a little bumpy. It’s also proving tricky to get the glazed translucent look that the ceramic ducks have. I am putting a lot of hope in the final varnish!

Update:

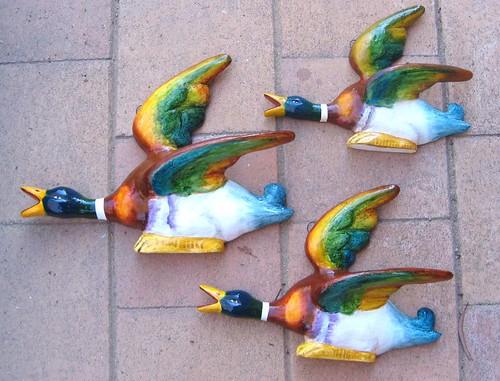
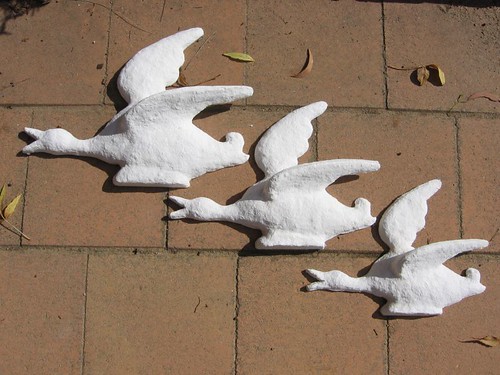
This is how they turned out. They are for “1 in A 100”, a play about mental illness (synopsis here) written by Mary Rachel Brown, directed by Carol Woodrow, design by Imogen Keen, at Canberra’s Street Theatre in May 2007.

IMG_3780-1

Flying ducks

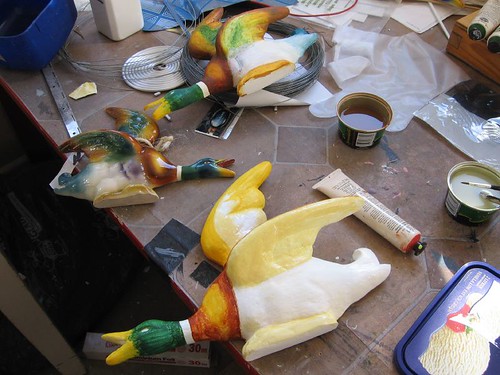
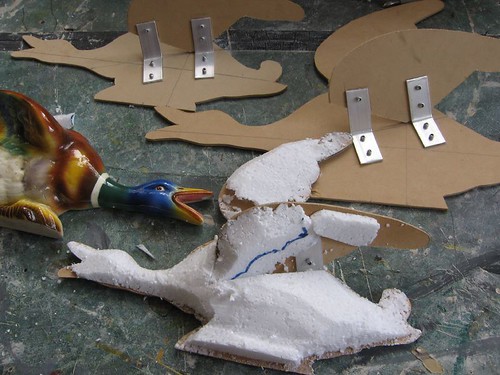
I’m working on several projects at once at the moment. One is making a set of those flying ducks that people had as wall ornaments when I was growing up. I’ve been lent a couple to model from, and looking at them up close I can understand their attraction, despite their kitsch reputation. Since the ones I am making are theatre props they only have to look like the real thing. Inside, they have an mdf structure, and I have bulked them out with polystyrene. I like carving styrene, except for the mess.

Flying ducks

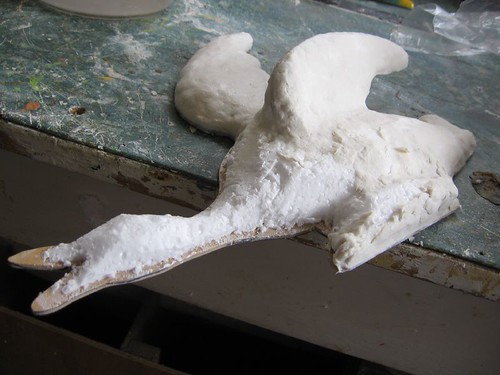
The next part of the process is covering the shapes with a commercial paper mache pulp. It starts as a dry mix, and when you add it to water it turns into a thick paste, which can be smoothed on and sticks to most surfaces. Here I’m half way through adding the paper mache to the big duck:

Flying ducks

The pulp takes a couple of days to dry, but I’m always impatient with things like this, and I have been hurrying it along by putting the ducks in the sun,

Flying ducks

and the oven:

Ducks in the oven

I’ll have to add more detail to the shapes, like the eyes, tails and feather patterns, and then its a matter of getting the surface smooth and painting it to look like china.

We have four beautiful white pet Indian Runner ducks, and it was funny to see them charging across the back garden in a line just as I was photograhing these in the kitchen.

Gimme a head with hair…

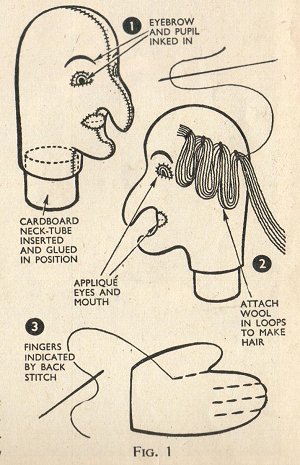
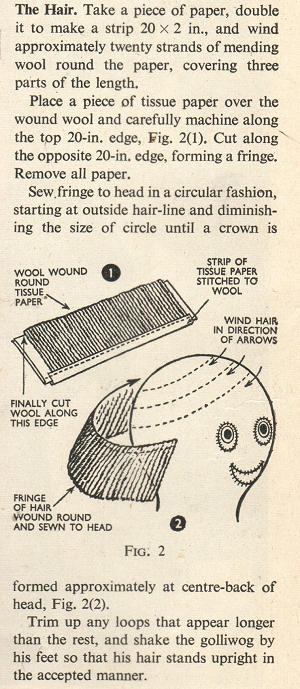
It’s nice to have Claire posting again at Loobylu. (Claire had a beautiful second baby girl recently – congratulations!). Her post today mentions the difficulties of making hair on dolls – I agree it is tricky, and depite the post title, I really don’t like dealing with hair at all! It jogged me to scan some drawings that I have found useful for hair making. They are from an old book we have called TOYS you can make yourself, published by Odhams Press Ltd, London, advisory editor Hilary Page. Other than that it has no copyright information, but I’d guess it’s from the late 40’s or 50’s.

In this first figure, the middle row of stitching is the parting of hair down the centre of the head. You make it as long as is needed to cover the head, and then draw back the hair into bunches or plaits or however you fancy and stitch them on.

Hair

I used this idea for the doll I made a while ago, but instead used an interesting kind of fabric. I always forget its name, but its something like ‘feathered velour’. I stitched it slightly gathered down the centre of the head, and then arranged it to look like strands of hair in bunches, and cut the ends to give it that effect, too. On a doll that size it was a lot easier and quicker than doing the wool
thing.

The next one shows making loops of hair. I guess you could cut the ends once the loops are sewn on.

Hair2

This one for gollywog hair is the one I have used most, not so much the circling attachment to the head which gives you the shock-headed hair, but the making of the hair by stitching it on doubled-over paper. It’s a bit like a flat pom-pom! Instead of circling, you can use it for rows around the side and back of the doll’s head, and for fringes.

Hair3

Some thoughts on make and craft

Back in September I made a late comment in a discussion thread on Shelley Powers‘ post, Craft/Make. I just want to pull it out and publish it here, and perhaps also on my OPML blog, because I don’t want to lose the thoughts in it.

‘The swap-o-rama-rama and the computer-related stuff were equally exciting at the Maker Faire. It was precisely that they were treated equally as cool exemplars of the DIY ethic that made this juxtaposition
so interesting. It wasn’t about gender, it was about the maker impulse, and all its forms.’

— Tim O’Reilly

‘It wasn’t about gender, it was about the maker impulse, and all its forms.’

I’m a maker for the performing and theatre arts, and I appreciate this reasoning. But using the swap-o-rama-rama as an example of making Maker Faire more gender-inclusive, and describing Craft magazine as having a more ‘female spin’ seems to me to turn that statement around, because there is an underlying assumption there about what females are interested in. In a banner at the Renegade Craft Fair, Craft Magazine has the by-line ‘Hang it, Stitch it, Wear it, Light it’: the assumption is still that women are primarily interested in decoration, sewing and fashion. While that may be stereotypically true, working on that
assumption is preserving and encouraging the status quo, (and making money from it), rather than challenging it and acknowledging that there are women out there whose skills and interests within the making and
craft world go well beyond those traditional interests expressed in a modern way. I also think there is a danger of diminishing craft by defining it in this way, just when it seemed to have broken lose from being a lesser creature by being included in the broader term, make.

As an aside, I’m also watchful about the new craft movement being somewhat bound up with retro and the 50’s, and I wonder if it means some of the social attitudes about gender from that time are also being revisited. I get worried when I see apron-making contests. Many craft bloggers are women with small children, and it must be great to have the community and connection of blogging if you are a stay-at-home mother. But I wonder if it also means that craft is still largely in the realm of something a woman makes for, or as a reflection of, her
domestic world, for love or pin-money, while the kids are small. There is nothing wrong with that seen for what it is, essentially a hobby and social activity, but it might mean the new craft movement is not so new
after all.

Hil

Yesterday Shelley wrote that O’Reilly’s company could do much to ensure that Craft attracts a good audience of men and women, and to encompass and encourage a broader less-gender-specific view of craft. My feeling is that the creation of Craft, in addition to Make, is essentially a marketing decision to diversify and increase their business domain by capitalizing on that ‘female spin’, and its therefore more likely to rely on preserving the status quo, as I said above. If it makes good business sense to divide Make and Craft in this way, I doubt Craft will go down the road that Shelley optimistically suggests.

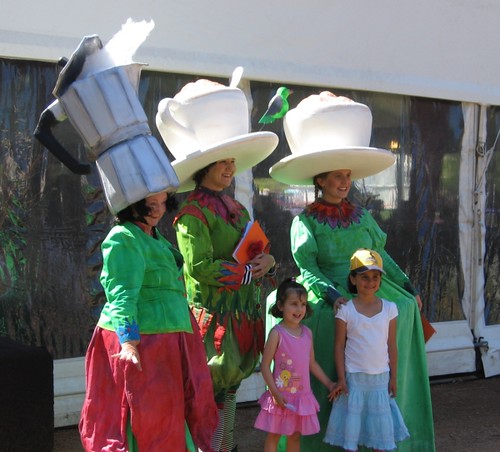
Espresso coffee hats

Espresso coffee hats

Making these fun hats was another of my Floriade projects. I enjoyed making them and was really happy with how they turned out. They were made for the performance group The Bunch of Posers, who in this guise are called Acappellacino.

To make them I started out by making the cup shape upside down, with a mixture of a garden pot and a garden hanging basket and clay. I started paper mache-ing it, but realised that the edges were going to curl when they dried, so instead I made a pattern from the shape (you put alfoil over it, masking tape it so it stays in the shape, then cut it into sections so
it becomes a 2D flat pattern). I could have made a small model and done the same and scaled it up if I hadn’t started down the paper mache track to begin with. Once I had the pattern, I cut it out of a particular thin dense type of foam sheeting and glued it up into the cup shape.

The top cup rim and the foam is made from a circle of polystyrene, so it gives the foam rigidity at the top. The saucer is slightly thicker foam, and the rim of the saucer is a ring of a kind of tubular insulation foam that the building trade uses (its called PEF backing rod, and its like those lengths of foam kids play with in swimming pools – pool noodles they are called here. But you can buy it in different diameters if you know where to go for building supplies.) The ring gave the saucer a nice rigidity. You can see the cups in the raw making phase in this picture.

Then it has muslin spray-glued on to the foam to give it a protective surface and kind of bring it all together. Then paint, with a bit of latex added to make it stick well.

The coffee pot was made in much the same way, just from foam. I made a pattern straight from my neighbour’s espresso pot and scaled it up (what I should have done with the cup, too!). However it does have a ring of light aluminium flat bar in the top rim and a couple of aluminium bars from the ring up into the lid to make the open lid possible and strong. The steam is dacron, the wadding stuff they put in quilts, with a wire through it.

The coffee cups just sit on your head like sombreros, but the coffee pot needed a chin stap which I filched from a bike helmet.

Here’s a video of the group in action, singing “You’re the Cream in my Coffee’. On my computer the sound only streams smoothly once its played through once.


(Click on the photo)

Laura Neuvonen’s The Last Knit

knit

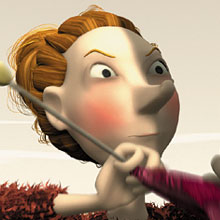
This lovely animation about knitting obsession, is written directed and animated by the Finnish animator, Laura Neuvonen.

(via CRAFT Magazine)