materials

Espresso coffee hats

Espresso coffee hats

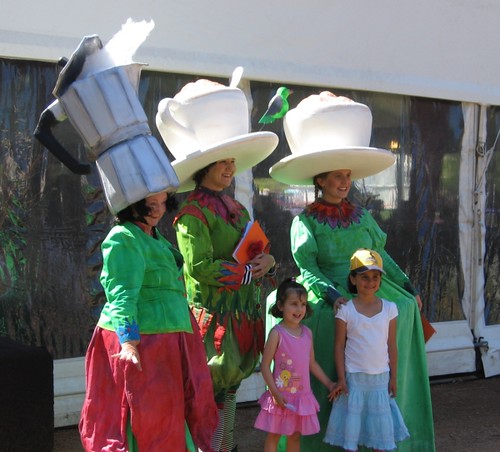
Making these fun hats was another of my Floriade projects. I enjoyed making them and was really happy with how they turned out. They were made for the performance group The Bunch of Posers, who in this guise are called Acappellacino.

To make them I started out by making the cup shape upside down, with a mixture of a garden pot and a garden hanging basket and clay. I started paper mache-ing it, but realised that the edges were going to curl when they dried, so instead I made a pattern from the shape (you put alfoil over it, masking tape it so it stays in the shape, then cut it into sections so
it becomes a 2D flat pattern). I could have made a small model and done the same and scaled it up if I hadn’t started down the paper mache track to begin with. Once I had the pattern, I cut it out of a particular thin dense type of foam sheeting and glued it up into the cup shape.

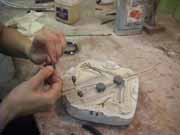
The top cup rim and the foam is made from a circle of polystyrene, so it gives the foam rigidity at the top. The saucer is slightly thicker foam, and the rim of the saucer is a ring of a kind of tubular insulation foam that the building trade uses (its called PEF backing rod, and its like those lengths of foam kids play with in swimming pools – pool noodles they are called here. But you can buy it in different diameters if you know where to go for building supplies.) The ring gave the saucer a nice rigidity. You can see the cups in the raw making phase in this picture.

Then it has muslin spray-glued on to the foam to give it a protective surface and kind of bring it all together. Then paint, with a bit of latex added to make it stick well.

The coffee pot was made in much the same way, just from foam. I made a pattern straight from my neighbour’s espresso pot and scaled it up (what I should have done with the cup, too!). However it does have a ring of light aluminium flat bar in the top rim and a couple of aluminium bars from the ring up into the lid to make the open lid possible and strong. The steam is dacron, the wadding stuff they put in quilts, with a wire through it.

The coffee cups just sit on your head like sombreros, but the coffee pot needed a chin stap which I filched from a bike helmet.

Here’s a video of the group in action, singing “You’re the Cream in my Coffee’. On my computer the sound only streams smoothly once its played through once.


(Click on the photo)

Simple rods puppets from recycled materials

RodThese are two simple rod puppets which were made by my son when he was about 8, at a workshop that I was involved with.

The materials were recycled bits and pieces. The basic pattern was a plastic bottle for a body; a stuffed sock for the head; cardboard tubes running through the bottle neck for the neck, and for holding the puppet from below; strips of foam for the arms; wire rods for manipulating arms and hands; and odds and ends of fabric and other things (glitter, eyes, bobbles, straws, paper, offcuts of leather, ribbons and cord, and so on) for features and decoration.

The main preparation for the workshop, apart from collecting all the materials, was making the rods, though they were simple enough. They were a strong wire (it must not bend too readily), cut to size, straightened, anchored in a length of dowel at one end, and bent or hooked (so that could be poked into the foam at the wrist) at the other end. To fix the wire in the dowel, drill a hole down the centre of the dowel that the wire will fit in tightly, and then make a tiny bend in the wire a centimetre or so from the end before pushing it it. For this purpose the bend is enough of a barb to keep the wire in.

Craft glue was used to attach fabrics and foam, but we had a nifty way (I still think it’s nifty!) for the kids to attach the arms to the body: cut a X about 3 cm across into the plastic and just push the foam through. Again, the tension and points of plastic are enough to secure the foam. The elbows and wrists are made just with string tied tightly around the foam, but they are surprisingly effective.

I think the most important aspect when doing this kind of workshop (after providing basic ideas, materials, and help) is to leave the rest to the imagination of the makers, so that other ideas in construction, features, characters and the stories that inevitably emerge with them, are welcome and valued.

Simple rod puppets

Foam Latex Puppetmaking Tutorial

foam

Boing Boing points to Kathi Zung, a NYC maker of foam latex puppets used in animated videos and films, and in particular to her Do-it-yourself Foam Latex Puppetmaking 101 tutorial on DVD. I’d like to try something like that sometime.

This is the same technique that was used to make the Leunig Animated series that brought Michael Leunig’s cartoons to life on SBS TV a few years ago. An exhibition showing how it had been made followed, and I loved being able to see in detail how it had been done. Strangely, while the animations themselves were really good, I felt some tension to do with the whole production of animating them weighing down the original whimsy of the cartoons.

Updated links  2015.

Moss graffiti and secret worlds

mosscastle

We have been deep in drought for some years, but in just the last few weeks we have had enough rain to encourage small patches of green to peep through, and suddenly there are beautiful verdant mounds of moss appearing in nooks and cracks in the pavement, and around trees in the gardens. I’m beginning to think I might be able to experiment with this recipe from Stories in Space for getting moss to grow in specific areas:

Recipe:
(serves to create several small pieces or 1 large piece of graffiti)
1 can beer,
1/2 teaspoon sugar
several clumps garden moss
Plastic container with lid, blender, paintbrush

‘To begin the recipe, first of all gather together several clumps of moss (moss can usually be found in
moist, shady places) and crumble them into a blender. Then add the beer and sugar and blend just long enough to create a smooth, creamy consistency. Now pour the mixture into a plastic container.
Find a suitable damp and shady wall on to which you can apply your moss milkshake. Paint your chosen design onto the wall (either free-hand or using a stencil). If possible try to return to the area over thefollowing weeks to ensure that the mixture is kept moist. Soon the bits of blended moss should begin to re-couperate into a whole rooted plant – maintaining your chosen design before eventually colonising
the whole area.’

I love the other images and ideas at Stories in Space, in particular Myrmidon Castle (pictured above), and Hideaway.

Ronnie Burkett’s Paper Mache Recipes and other things

Having seen Ronnie Burkett‘s amazing Tinka’s New Dress in its last season at the Melbourne Festival in 2002, and heard him speak so inspiringly at the Puppetry Summit there at the same time, I was interested to see Burkett’s article on paper mache (via Puppetry News and Views).

The article talks about recipes for making one’s own paper mache pulp, and the various situations they are useful for, but Burkett also says that much of the time he now uses a commercial papier mache pulp called Celluclay. I thought it would be ideal for a court jester’s marrotte that I was making, but its hard to come by here, so I tried Mix-It, which is made in Victoria. When I tried an instant paper pulp before many years ago, it was quite lumpy, but this mix turned out to be nice and smooth to work, and dried really hard and white.

Marrotte
The head was sculpted over a wood and polystyrene base, so that the layer of paper mache is relatively thin, which has the advantage of taking less time to dry, and being economical. It’s also non-toxic and takes paint and finishes of all kinds.I did like reading that Burkett also suffers from impatience waiting for casts to be ready and things to dry.
Marrotte

Dave Riley’s Mask Studio tutorials

Dave Riley is a mask-maker, puppeteer and playwright based in Brisbane. His Mask Studio tutorials have been of great help to me a number of times – thanks Dave! There are two mask tutorials:

The felt method is really interesting. It involves soaking the felt in white glue and then moulding it to shape rather like working leather. There are then different finishes to experiment with, including paint, and leather gloss and polish. The result is a very light strong mask.

A few years ago when I first tried it and made a series of animal masks, I built on a paper mache base because I wasn’t sure it would be strong enough otherwise, but recently in making some smaller masks for Hidden Corners’ ‘See Beneath’, I was more confident in using the felt by itself, with a muslin/white glue backing to make the inside comfortable and strong.

Masks before painting


The seaweed fronds had a little extra strengthening, just because the shape was not intrinsically strong like the shell. The fishy mask was done a little differently, without felt because I wanted finer detail. It is carved quite thinly out of styrofoam, and has several layers of muslin and white glue to give it strength.

Masks


These have a water-based polymer gloss varnish added to the paint, which kind of plasticizes them.

Instant grab spray adhesive for polystyrene

I’ve found a spray adhesive that sticks polystyrene with an instant grab – this is worth shouting about! Its in the 3M range, and is called Multi-Purpose Spray Adhesive. I’m amused by this graphic on the US site:

Botticelli because there is a humourous appreciation there of the beauty and godsend of finding the right glue for the job, but also because it reminds me of my Darcy Venus from Pemberley days.

Just about all glues eat polystyrene. White PVA glue and epoxy resins like Araldite are the exceptions, but they take time to dry, and the work has to be clamped meanwhile. One or two of the liquid-nails-type adhesives can be used, depending on the job, but they melt polystyrene to a certain extent, and are lumpy.

The can of Multi-Purpose Spray Adhesive that I bought here in Canberra doesn’t have the ‘Super 77’ tag on it, and is half-green-half-black rather than red. I’m assuming that its just different packaging, and the content is the same, but it might be worth checking. It’s a 467g can, boasts 6 times more coverage than any other competitor, and is expensive: AU$29.95. But its worth it.

Liquid rubber and other moulding and casting resources

I’ve come across some interesting sites to do with making in the last few days.

Smooth-On: These people produce liquid rubbers and plastics for artists and industry: silicone rubbers, urethane rubbers, liquid plastics, foams and so on. They offer detailed product and technical information, and their How to step-by-step turorials on various ways of moulding and casting look great.

Rowe Trading Company: The Australian distributers for Smooth-On, based in Adelaide. I notice that Rowe are also distributers for Bondmaster adhesives. Most of us who make foam puppets are used to using Gel Grip, or a similar type of contact glue to join foam pieces. Its smelly, you have to take care with the fumes, and it takes a few minutes to go tacky before you can press the two surfaces together. Bondmaster produces a much friendlier two-part glue which consists of a pinkish dab-on liquid, and a spray-on catalyst. It bonds foam immediately, has no smell to speak of, and is easier to get into deep places, and onto fabric. In a few circumstances though, say when seams are under pressure, I still opt to use Gel Grip. And the last I heard, Bondmaster is hard to buy except in industrial quantities.

Barnes Products: I’ve heard good things about this Sydney moulding and casting supplier. Their catalogue is online, and they have a range of videos and books on moulding and casting.

Activa products: Activa make an interesting air-dry casting compound called LI-QUA-CHÉ, which is a recycled paper fibre polymer based compound. Its looks like clay slip, and dries to a hard durable glossy satin finish.