recipe

Homemade yoghurt

I’ve been making yoghurt for a couple of months now, and I’m still blown away by how easy and good it is! I got my recipe from searching Down to Earth.

Here’s what I do:

  • Mix 1 1/4 cups of powdered milk into 750ml cold water. (Or just under a litre of any kind of milk; if powdered, mix according to recommended proportions and add an extra 1/4 cup of powder)
  • Heat milk in a saucepan until it is really really about to boil over.
  • While the milk is heating pour boiling water into the pot the yoghurt will set it, and its lid, to sterilize them. I’m using a kg pot left over from when I last bought yoghurt.
  • Tip the water out, pour the milk in.
  • Put on the lid and let the milk cool to only just warm; this takes an hour or more.
  • Stir in three or so tablespoons of good fresh live-culture natural yoghurt.
  • Put on the lid again, wrap the pot in a towel and leave it untouched in a warm place for about 12 hours.
  • Voilà! Yum!

I’ve taken to making this while I am preparing dinner, then it sits by the fire overnight, and is ready in the morning. But I’ve also had success with putting the pot in an esky with some containers of boiling water. And yes, once you make one batch you can use it to make the next.

Banana cake!

This is my absolute favourite cake. I like it best when it’s completely cooled down, and without any icing. It’s also really good buttered like bread. It always has interesting little dark specks in it, though I have known people to make banana cake that doesn’t – but that’s just weird!

Cake

Banana Bread

2 cups SR flour
125 g (1/4 lb) butter or marg
2 eggs
3 or 4 ripe bananas (can be over-ripe, variable number)
1 cup sugar
1 level teaspoon bicarbonate of soda
pinch salt

Cream butter and sugar, add mashed bananas, beat well, add beaten eggs. Sift flour and salt and add to mixture with 1/4 cup water in which the soda has been dissolved, beat well. Bake in a moderate oven for 1 hour.

The picture is me aged 7, showing off the first cake I ever made. I still have the little apron with the African animals, as I was fond of it. But I don’t bake often these days, and I discarded aprons many years ago.

Moss graffiti and secret worlds

mosscastle

We have been deep in drought for some years, but in just the last few weeks we have had enough rain to encourage small patches of green to peep through, and suddenly there are beautiful verdant mounds of moss appearing in nooks and cracks in the pavement, and around trees in the gardens. I’m beginning to think I might be able to experiment with this recipe from Stories in Space for getting moss to grow in specific areas:

Recipe:
(serves to create several small pieces or 1 large piece of graffiti)
1 can beer,
1/2 teaspoon sugar
several clumps garden moss
Plastic container with lid, blender, paintbrush

‘To begin the recipe, first of all gather together several clumps of moss (moss can usually be found in
moist, shady places) and crumble them into a blender. Then add the beer and sugar and blend just long enough to create a smooth, creamy consistency. Now pour the mixture into a plastic container.
Find a suitable damp and shady wall on to which you can apply your moss milkshake. Paint your chosen design onto the wall (either free-hand or using a stencil). If possible try to return to the area over thefollowing weeks to ensure that the mixture is kept moist. Soon the bits of blended moss should begin to re-couperate into a whole rooted plant – maintaining your chosen design before eventually colonising
the whole area.’

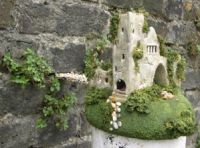
I love the other images and ideas at Stories in Space, in particular Myrmidon Castle (pictured above), and Hideaway.

Ronnie Burkett’s Paper Mache Recipes and other things

Having seen Ronnie Burkett‘s amazing Tinka’s New Dress in its last season at the Melbourne Festival in 2002, and heard him speak so inspiringly at the Puppetry Summit there at the same time, I was interested to see Burkett’s article on paper mache (via Puppetry News and Views).

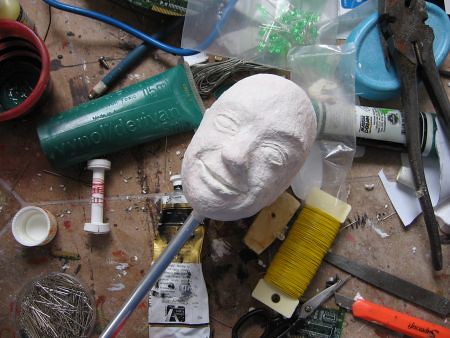
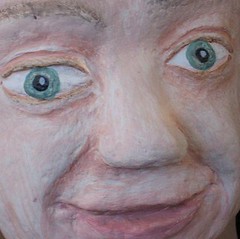
The article talks about recipes for making one’s own paper mache pulp, and the various situations they are useful for, but Burkett also says that much of the time he now uses a commercial papier mache pulp called Celluclay. I thought it would be ideal for a court jester’s marrotte that I was making, but its hard to come by here, so I tried Mix-It, which is made in Victoria. When I tried an instant paper pulp before many years ago, it was quite lumpy, but this mix turned out to be nice and smooth to work, and dried really hard and white.

Marrotte
The head was sculpted over a wood and polystyrene base, so that the layer of paper mache is relatively thin, which has the advantage of taking less time to dry, and being economical. It’s also non-toxic and takes paint and finishes of all kinds.I did like reading that Burkett also suffers from impatience waiting for casts to be ready and things to dry.
Marrotte